Membership
The Membership doctype allows you to record membership details for the Member.
Membership is a term which refers to any organization that allows people to subscribe, and often requires them to pay a membership fee or "subscription".
To create new Membership go to:
Non Profit > Membership > New
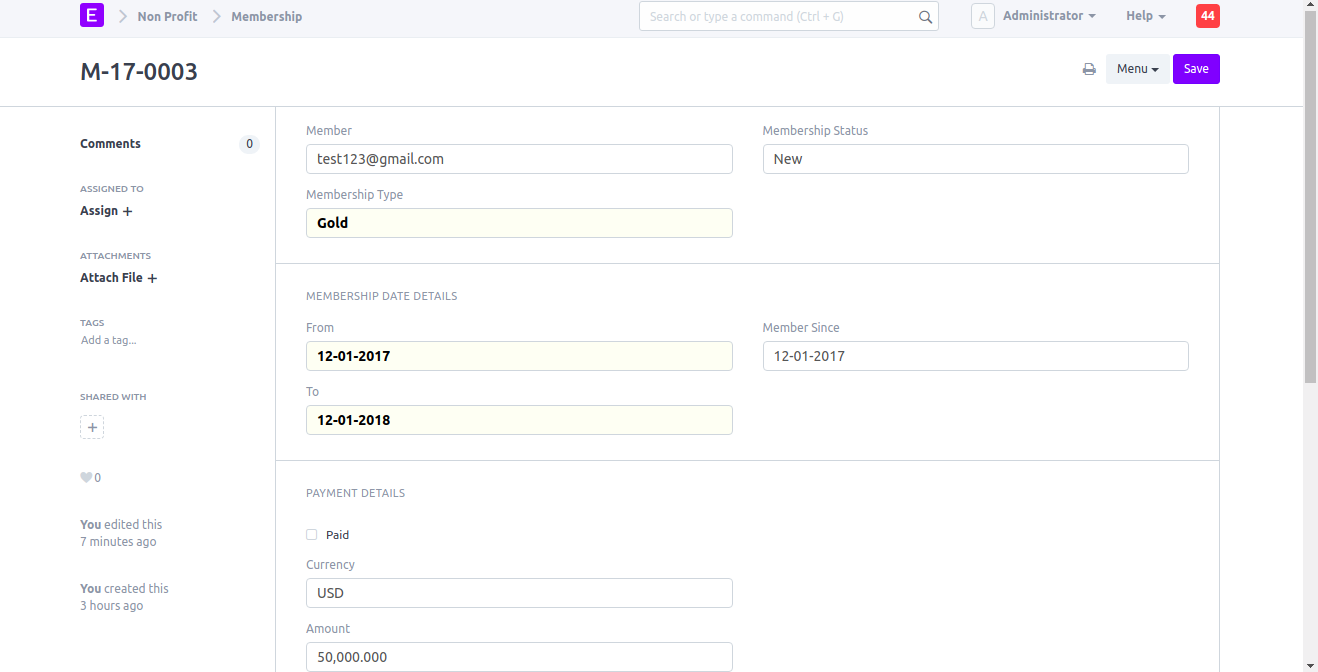
Member: Member is a link field fetch member details from Member doctype.
Membership Status: Membership Status is a select field which contains New, Current, Expired, Pending and Cancelled.
Membership Date Details section: This section contain information related to Membership start date, end date and member since date.
Payment Details: This section contains payment related details. If the person paid for membership checkbox paid is marked as checked else unmarked. Amount fetch based on membership type.
Setting Up RazorPay
For recurring membership payments you can setup razorpay subscription for members. You can find instructions on setting up razorpay here
Note: This feature is available in Version 13 and above only.
You can follow the steps listed below to setup razorpay subscription for memberships.
- Setup RazorPay
- Setup Billing details
- Setup Plans
- Import Existing Members
- Setup RazorPay Webhook
- Setup Website
Setting Up
You can find instructions on setting up razorpay here. You can setup billing in Membership Settings in the Non Profit module.
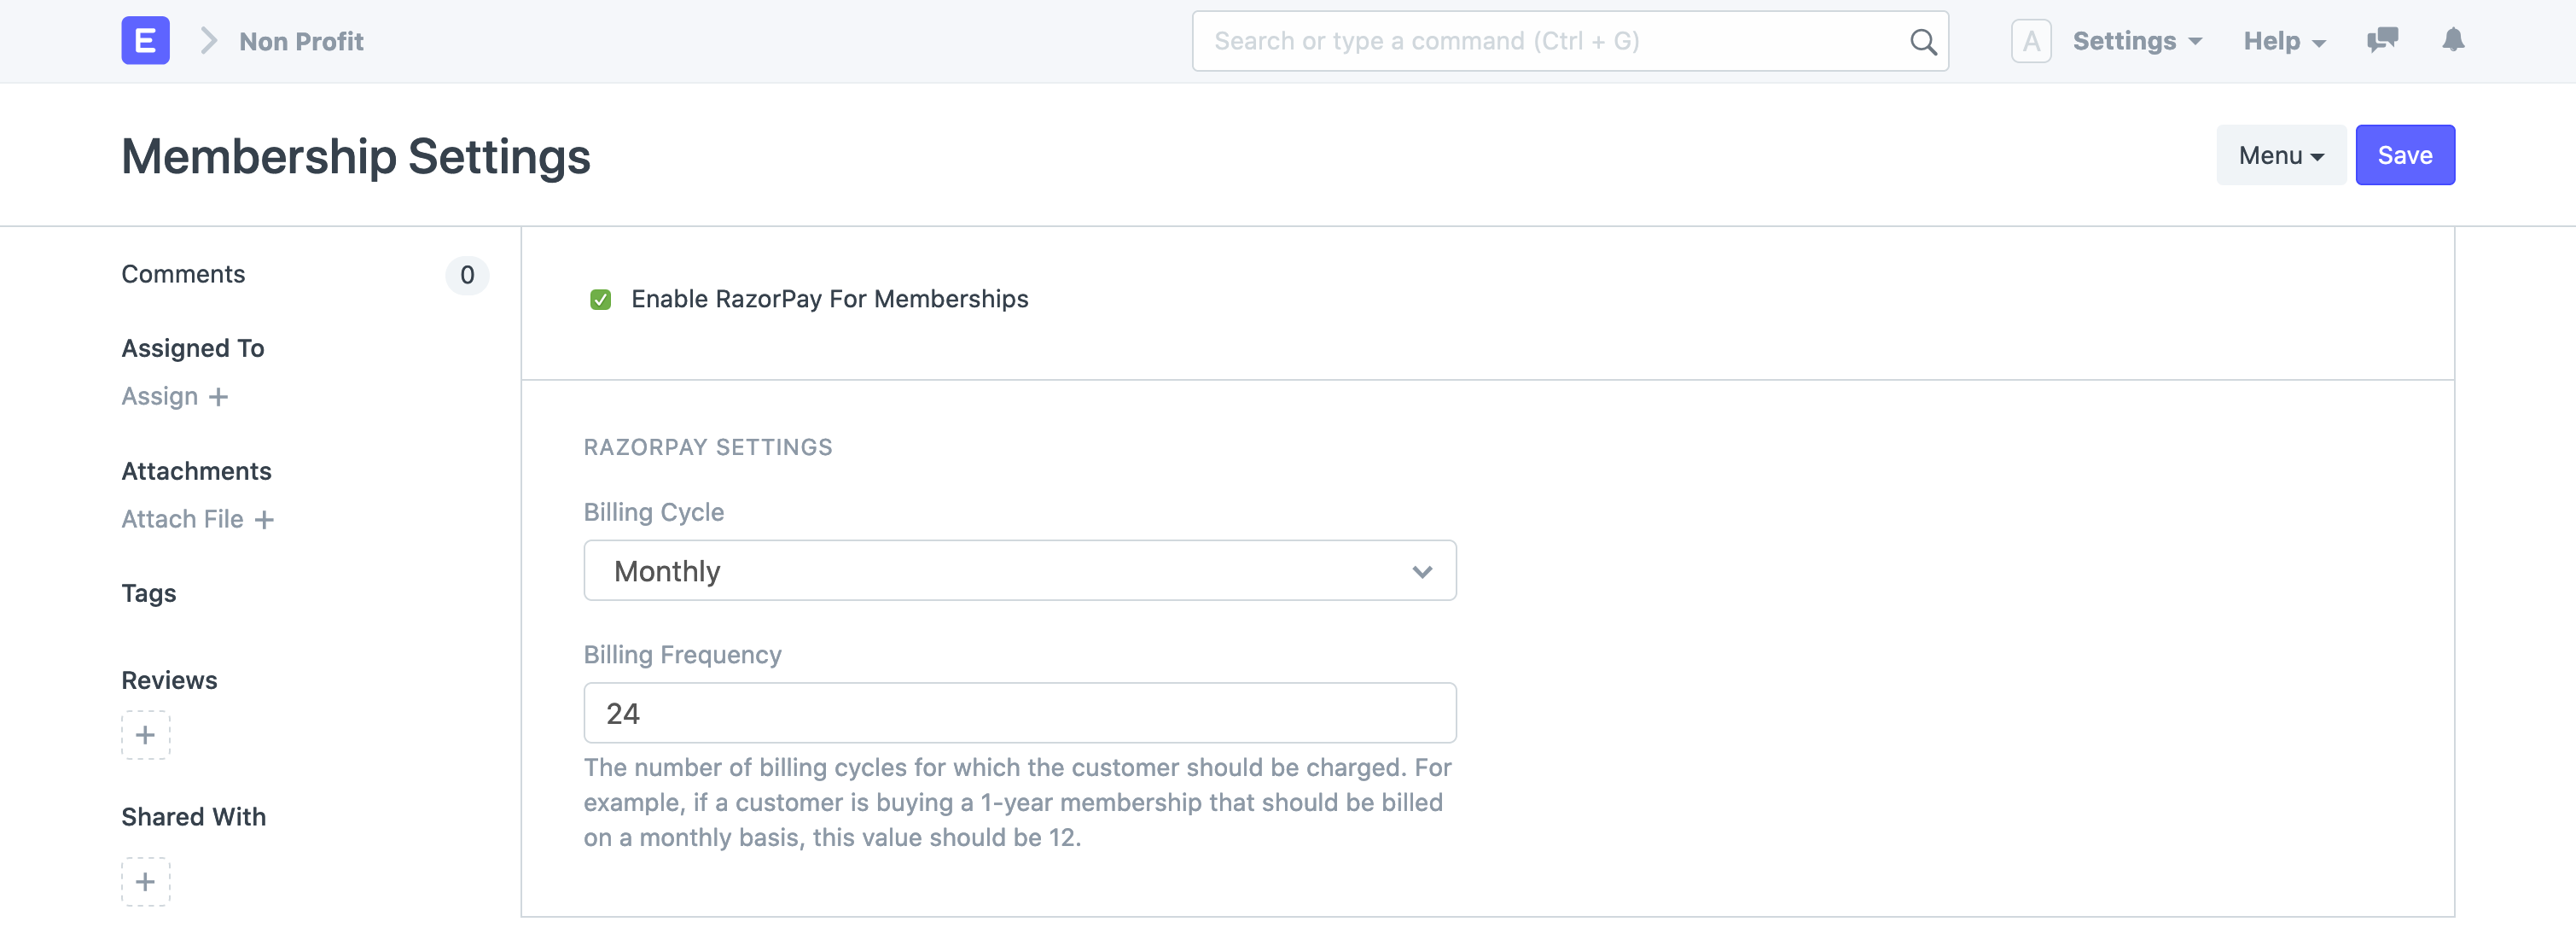
Checking Enable RazorPay For Memberships will show you more configuration options.
- Billing Cycle: This is the period of time between billings. You can either select Monthly or Yearly Billing.
- Billing Frequency: The number of billing cycles for which the customer should be charged. For example, if a customer is buying a 1-year membership that should be billed on a monthly basis, this value should be 12.
Setting Up Plans
Membership Type corresponds to your RazorPay plan. You can read more about Membership Plan here
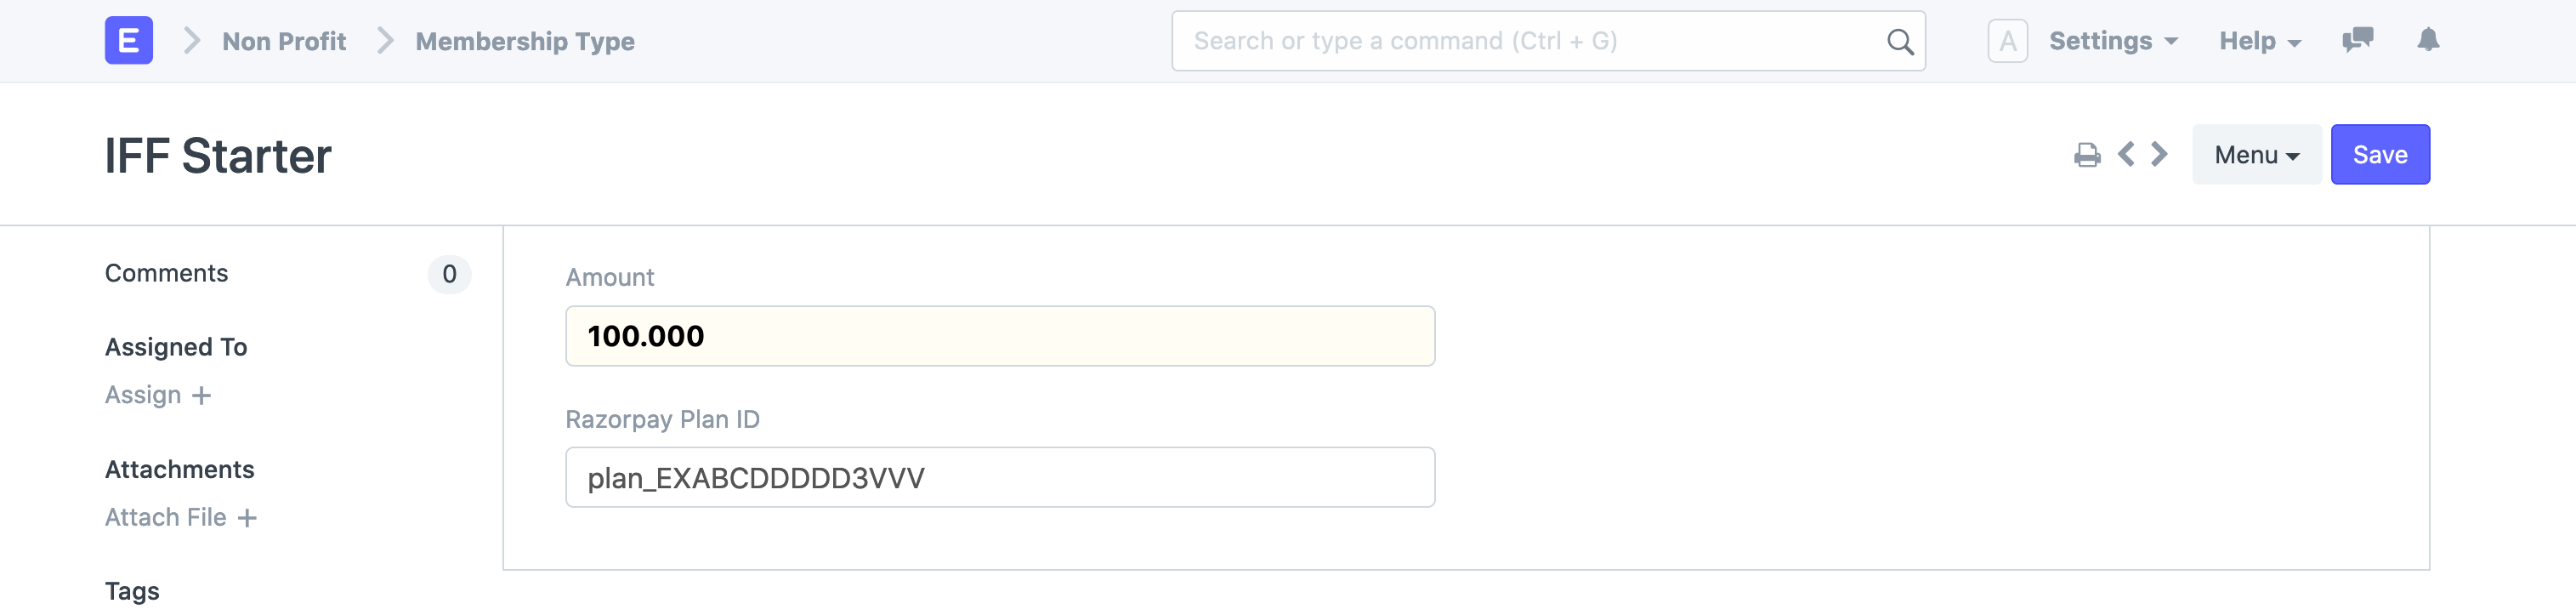
When razorpay subscription options is activated, you will see a Plan ID field. This is where you can add the plan id from razorpay.
Note: You have to add all your active plans and legacy plans for seamless billing.
Importing Members
If you already have members you can import them using the Data Import Tool. Here's a video tutorial of the same.
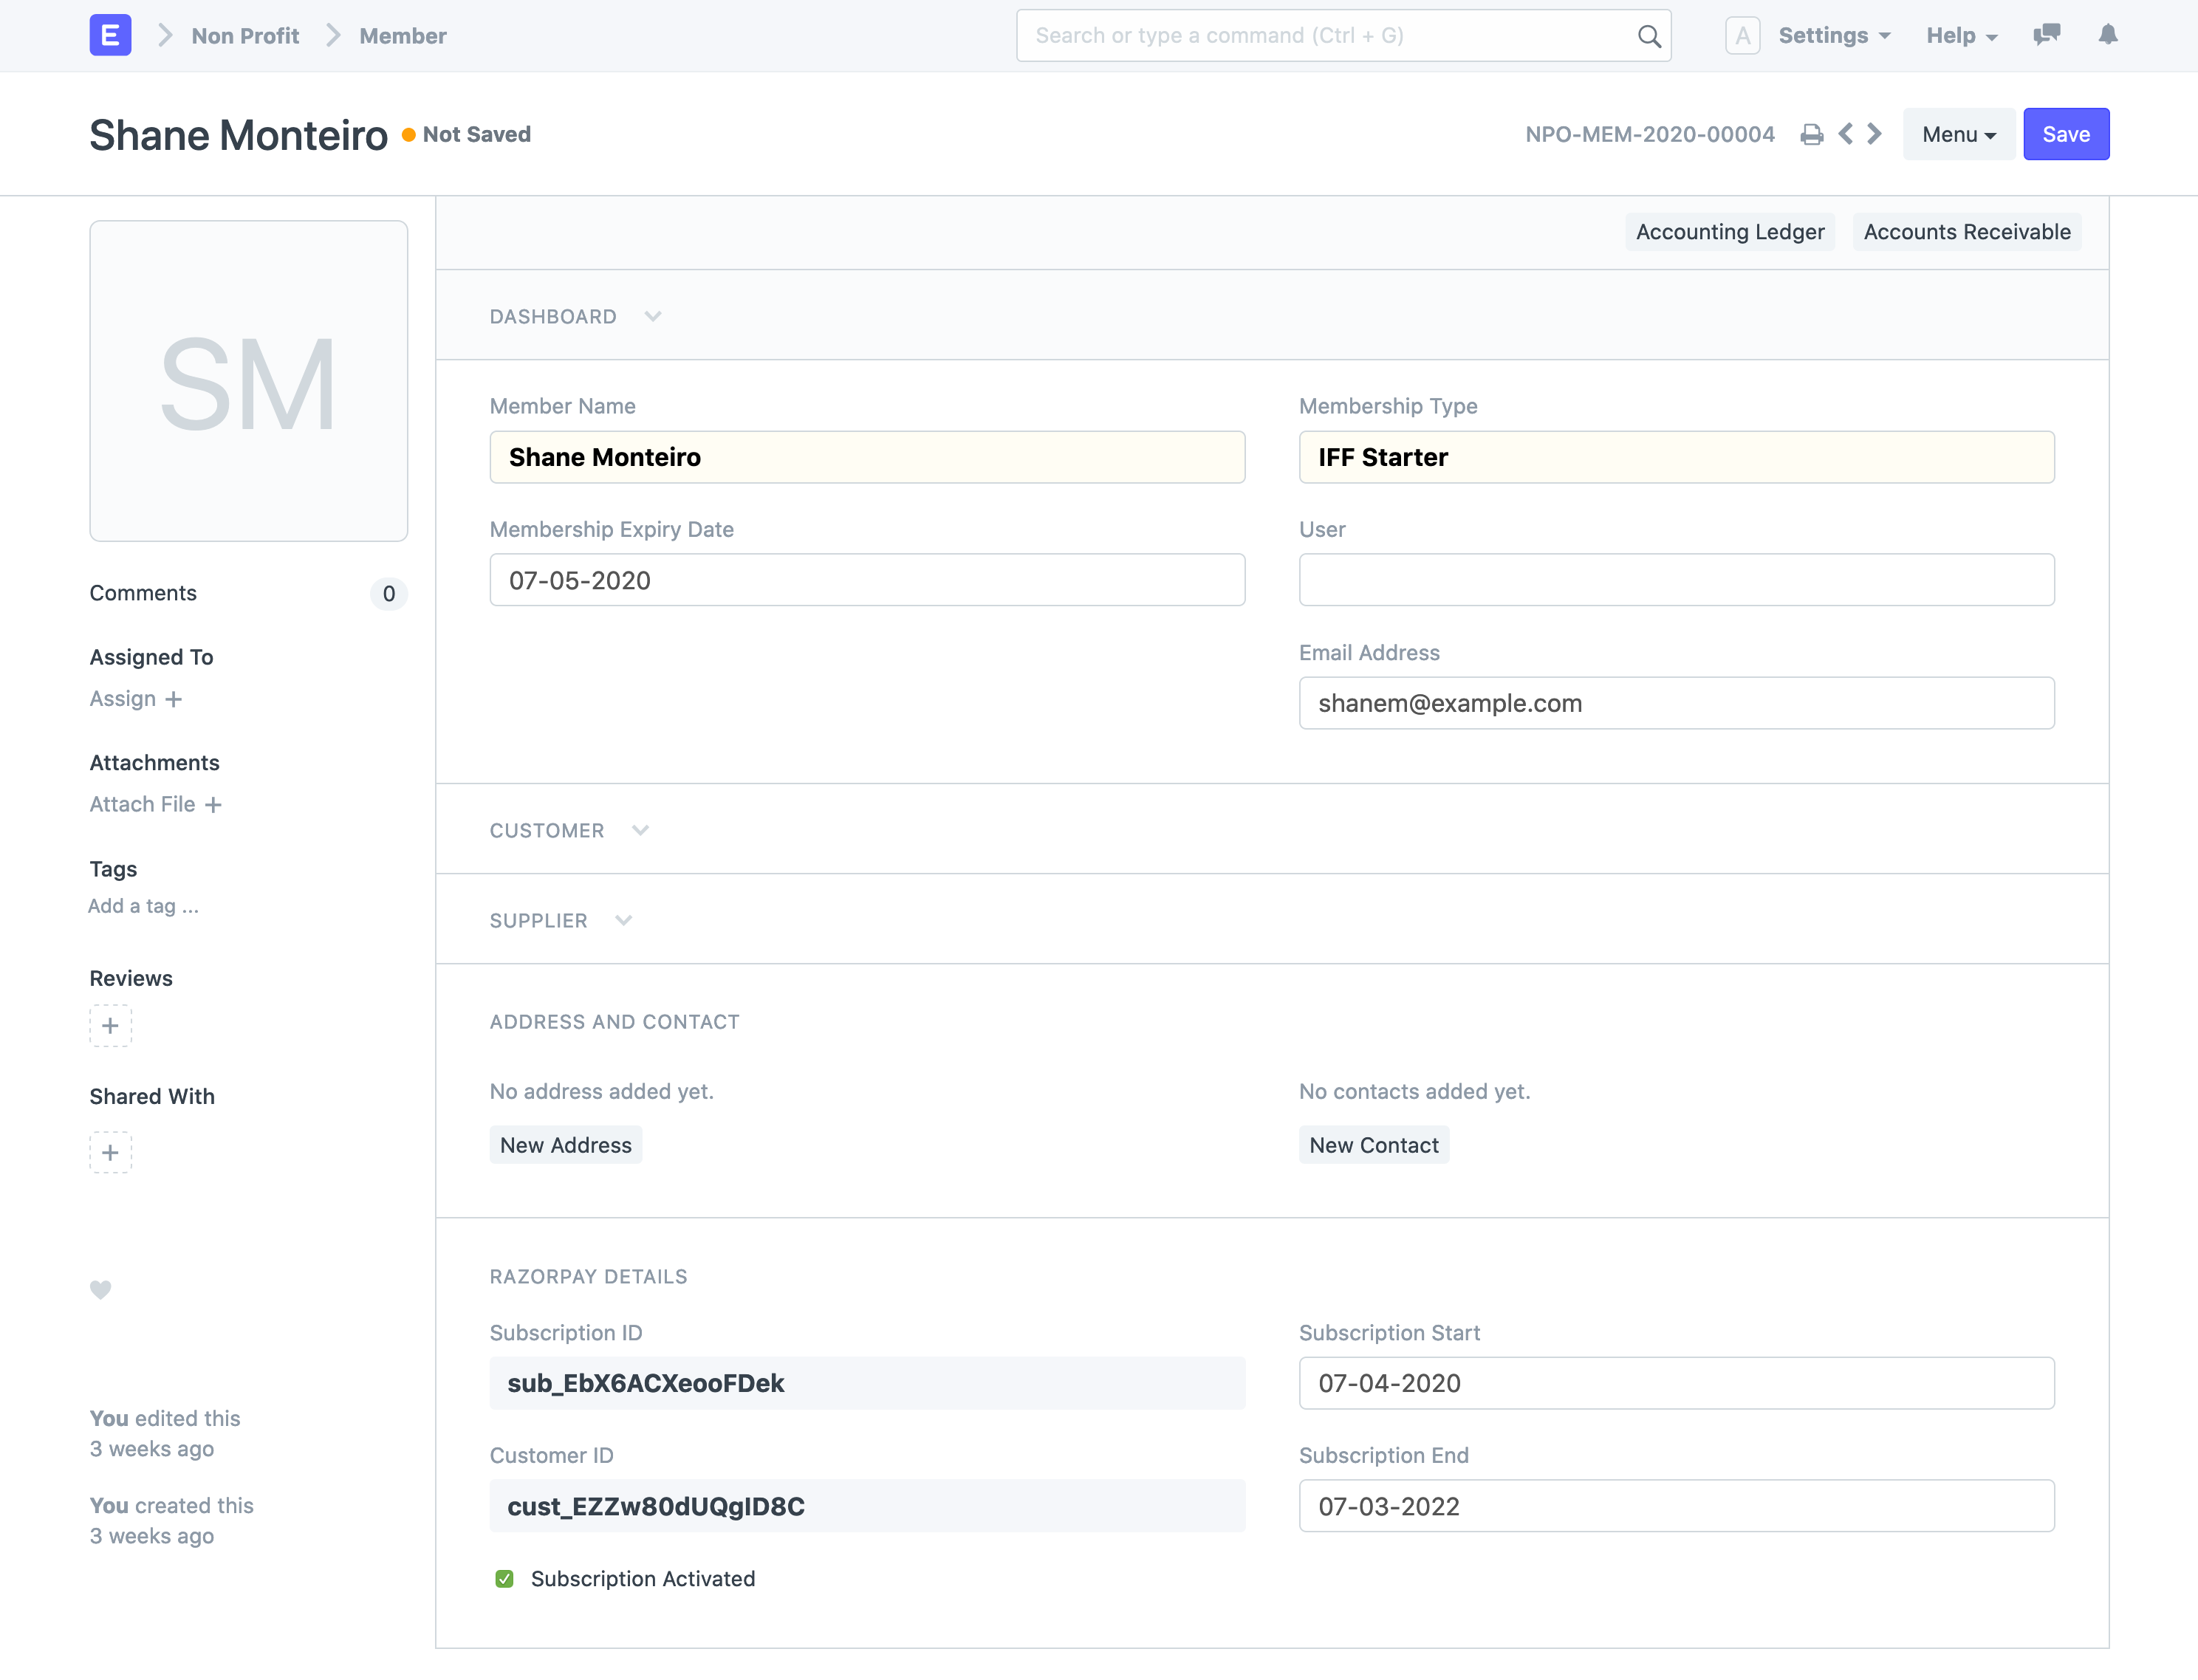
You need to import members with the following fields.
- Member Name: Full name of the member
- Membership Type: Name of the plan they are subscribed to
- Email Address: Email ID used for razorpay transactions
- Subscription ID: Subscription ID provided by RazorPay
- Customer ID: Subscription ID provided by RazorPay
- Member PAN: This is optional
Note: RazorPay subscriptions will only be tracked for those members whose data exists in the Member list.
This is how a member will look like in ERPNext.
Setting up webhook
You can setup webhook from the RazorPay dashboard in settings. You can read more about webhooks in RazorPay here. This webhook will notify your ERPNext site whenever a new subscription is created or renewed.
You will need the following details to setup the webhook.
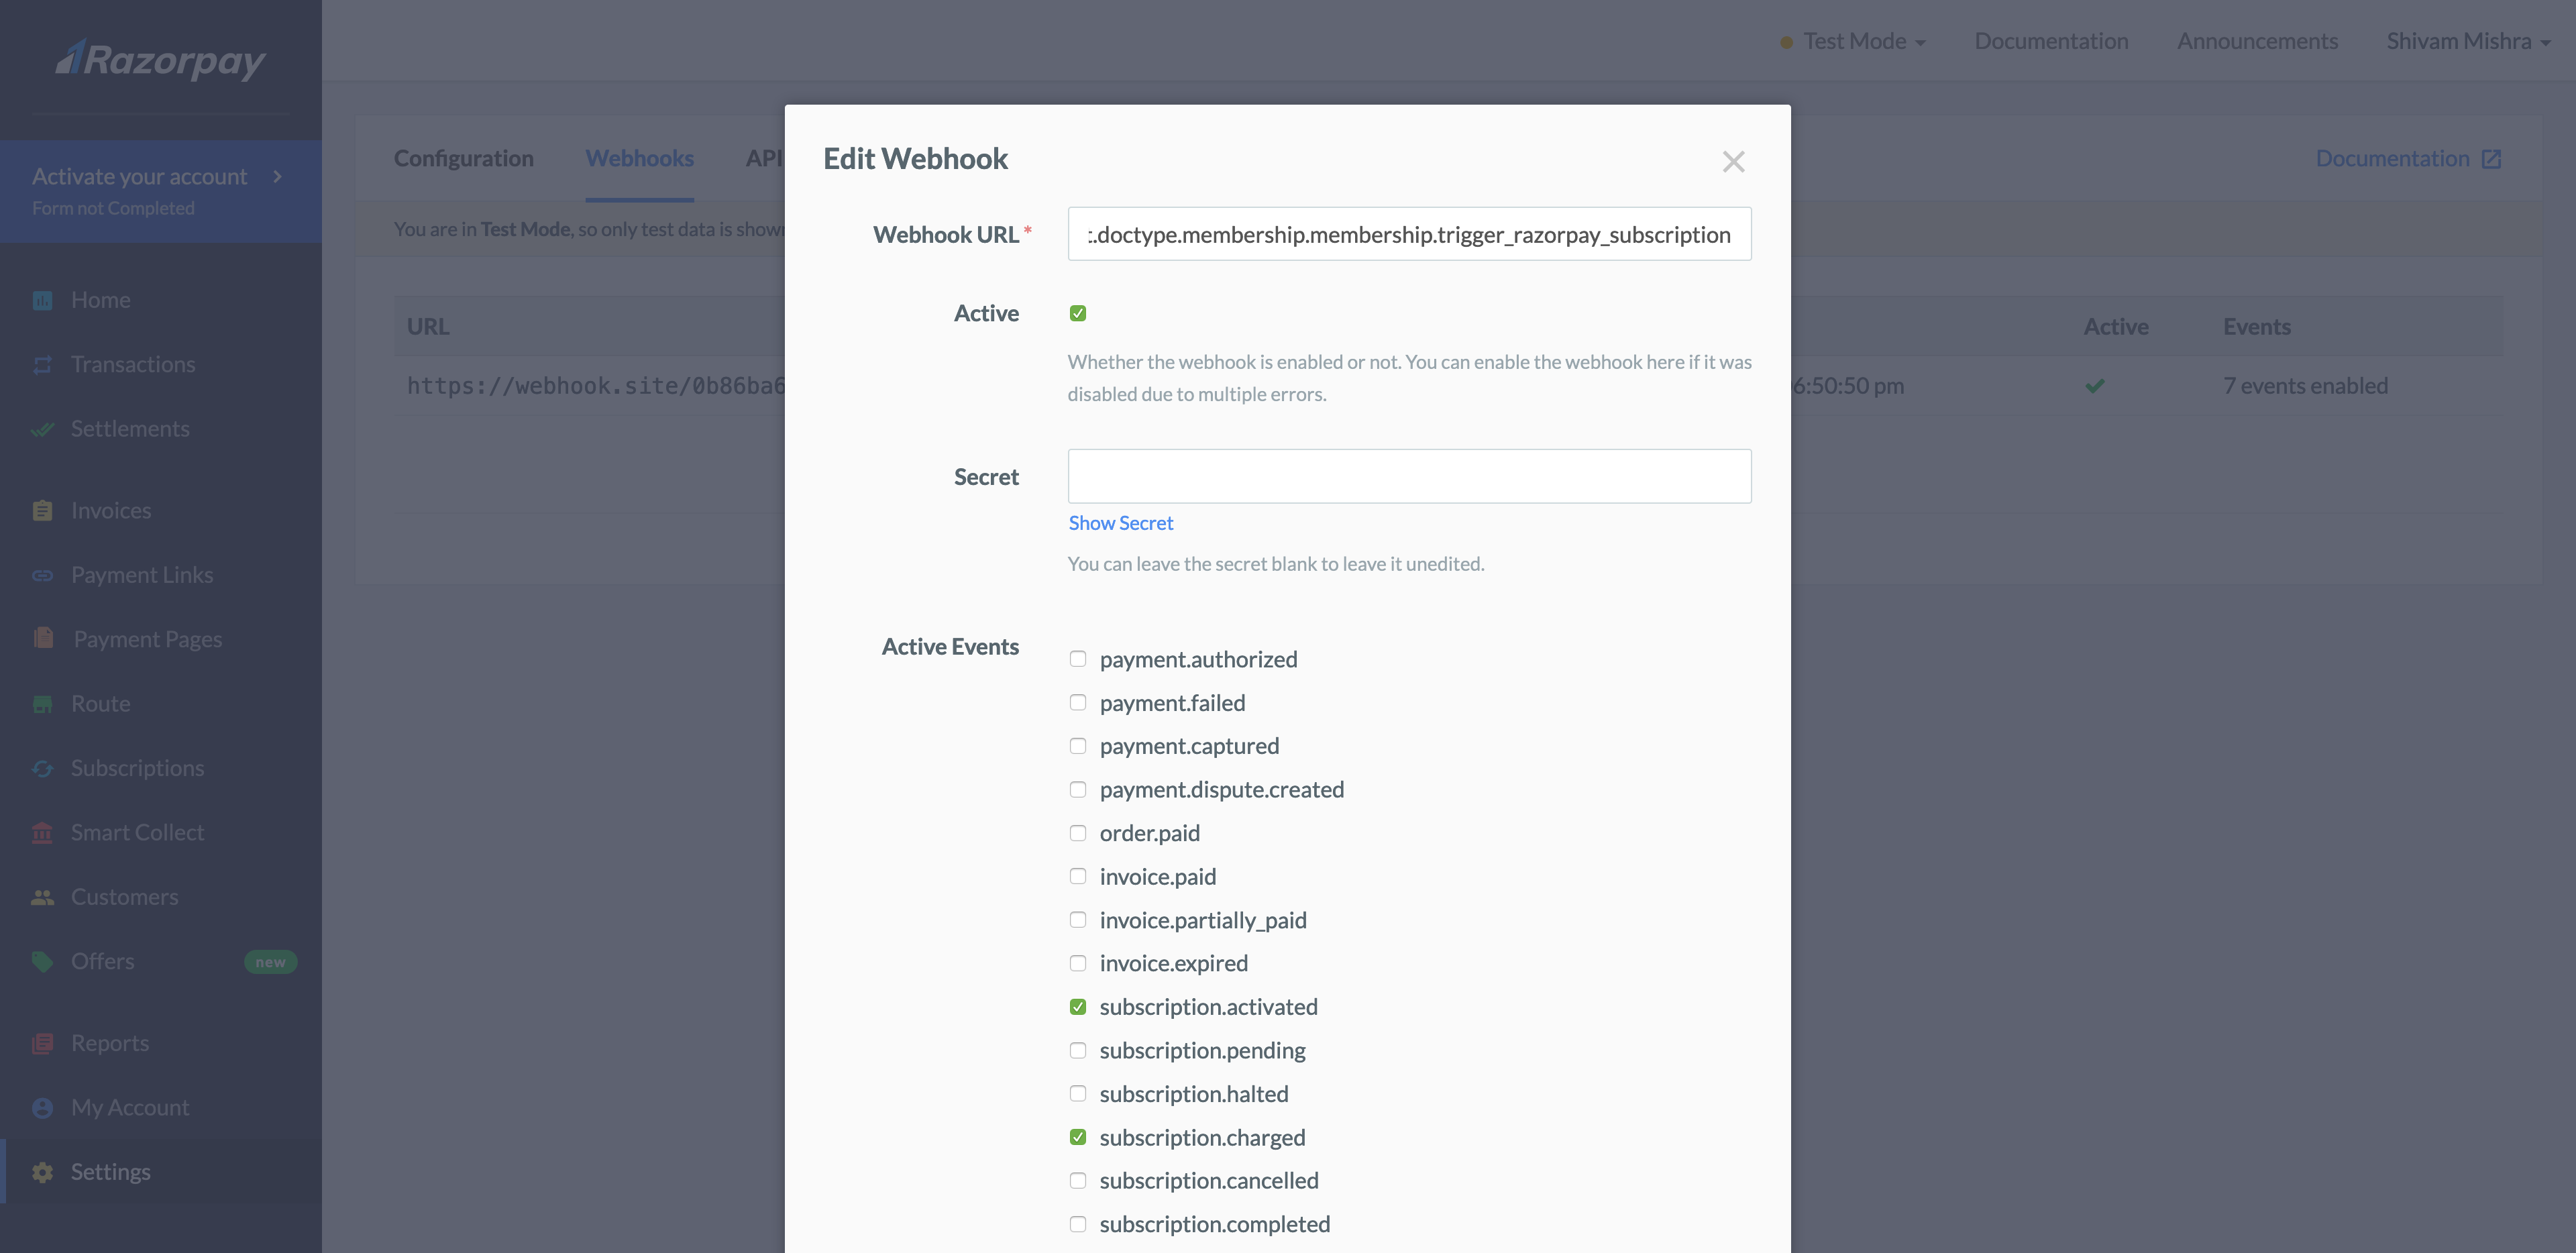
Webhook URL
The following is the URL for your ERPNext site. This is the endpoint RazorPay will utilize to notify of any subscription related activity.
https://<your-site>/api/method/erpnext.non_profit.doctype.membership.membership.trigger_razorpay_subscription
Events
You have to enable subscription.activated and subscription.charged events.
Active
Check this to enable the webhook
With this your webhook is activated
Triggering new subscription from your website
You can use the RazorPay client side integration to setup payment on your site. To do so, you will first have to create a subscription order with RazorPay against which you can trigger a payment.
To create a subscription order, you can use the create_member_subscription_order endpoint in ERPNext.
You can send a POST request at the follwing endpoint
https://<your-site>/api/method/erpnext.non_profit.doctype.member.member.create_member_subscription_order
The arguments to be passed is a dictionary with member details
{
    "plan_id": "Foundation Starter" // Plan name as detailed in Membership Type
    "fullname": "John Doe",
    "mobile": "7506000000",
    "email": "jane@example.com",
    "pan": "Testing123"
}
On successful creation, a member and customer will automatically be created. The endpoint will return a JSON as follows.
{
    'subscription_details': {
        'plan_id': 'plan_EXwyxDYDCj3X4v',
        'customer_notify': 1
    },
    'subscription_id': 'sub_EZycCvXFvqnC6p'
}
You can use the subscription_id to trigger a payment.